
STEM Tip #1 - Use Cardboard & Tape
This post may contain affiliate links. You pay the same and I get a small commission. Yay!
These everyday materials will make engineering in the classroom so much easier!
Why are cardboard and tape the best materials for a STEM challenge?
When I first started to incorporate STEM challenges into my classroom they always seemed so overwhelming. I would find an amazing activity on Pinterest and get so excited until I looked at the materials list… Running out to the store the night before with absolutely no budget was not an option. That’s until I discovered that almost every challenge can be completed using just cardboard and masking tape.
There are many reasons cardboard and tape are excellent resources for STEM challenges however I want to highlight my top four.
Cardboard and tape are easy to find and are inexpensive
Cardboard and tape are everyday materials that inspire students to create at home
There are a lot of different ways to cut, fold, and reshape cardboard
Cardboard and tape can be used in grade level classrooms or for STEAM specials
Reason #1 - Cardboard and tape are easy to find and are inexpensive
If your house is anything like mine, you have a constant flow of Amazon boxes. I constantly break these down and cut them into usable pieces for my students. I do have a secret about how to keep your hands from aching while cutting all the cardboard…a cardboard cutter! I prefer this one so much I have purchased it more than once! Now that I have traded my scissors for this rotary cutter I never looked back. Do yourself a favor, your hands will thank you!
At our school building we also get reams of paper delivered in white cardboard boxes. I do the same with these, I break them down and cut them into usable pieces. The custodian loves me because I take that job off of her hands.
As far as masking tape goes, be careful when you order. I have tried many different brands but I find this pack gives me the most bang for my buck. I have used tape in the past that immediately curls and falls off. There is nothing more frustrating! I haven't had that issue with this brand. However, I do teach the students to place the tape on their design and then rub it down so it turns translucent.
The other benefit of using cardboard and tape in your classroom is that families can easily donate to your supply. This is an inexpensive (or a free) way for families to feel like they are contributing to the classroom. Be careful, if you ask for cardboard box donations you will receive A LOT!
Reason #2 - Cardboard and tape are everyday materials that inspire students to create at home
One year right before summer break I had the students do a design project that was based on the story of Caine's Arcade. The students made their own arcade games and invited other classrooms to play. One week into summer I received a message from a parent (who was not in my room) stating that her son was building a cardboard arcade in their garage! She was ecstatic that her son was exploring and creating instead of being plugged into a screen.

However, the students’ creativity will not be limited to arcade games! Cardboard can be an incredibly versatile material for children to explore and create with. It can be transformed into a multitude of shapes and structures, allowing kids to use their imaginations and explore new ideas. Cardboard encourages children to think outside of the box and come up with creative solutions to problems. It's also a great way to introduce them to basic engineering and design principles, while also teaching them the importance of recycling and sustainability. With a little bit of imagination, cardboard can be used to build fortresses, robots, boats, and more!
Reason #3 - There are a lot of different ways to cut, fold, and reshape cardboard
First, you can teach students to look around for shapes they would like to trace. For example, a bowl flipped over makes for an excellent circle template. Or a pencil box can work for a rectangle. Soon you will see the students looking around the room and noticing decoration and supplies that can serve an entirely different purpose.
You can teach students how to cut flaps that open in various ways. If you need a marble to fall out of an opening the flap can open downward. If the students need the flap to serve as a door, it can open to the side.
Students can be taught to create walls or sides with cardboard by using an L-brace. The students place a piece of tape half on/half off the piece of cardboard. They then fold the tape out and place it on the base piece. Students will then repeat these steps on the inside of the wall.

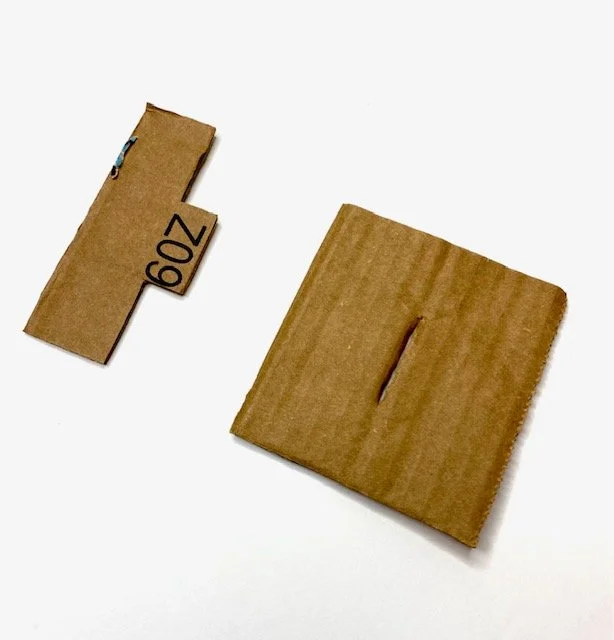
Finally, you can show students how to make one side of a piece of cardboard with a tab and then to create a slot in another piece. Once you insert the tab into the slot you have a secure structure.

Reason #4 - Cardboard and tape can be used in grade level classrooms or for STEAM specials
Both materials are simple for the teacher to gather. No more late night trips to the store to prepare for the next day! They also work well as the main materials when your students are taking part in an Engineering Design challenge. They give students the freedom to design exactly what is in their plan because cardboard can be cut, folded, or attached to create any new design that you can imagine.
All in all, cardboard and tape are great materials to use for a STEM challenge because they are affordable, durable, and versatile. Cardboard is lightweight and can be cut, bent, and shaped into almost any 3D structure, while tape provides strong adhesion to keep the structure together. With cardboard and tape, you can create a wide variety of projects and challenges that will test your students' creativity, problem-solving skills, and engineering knowledge.
